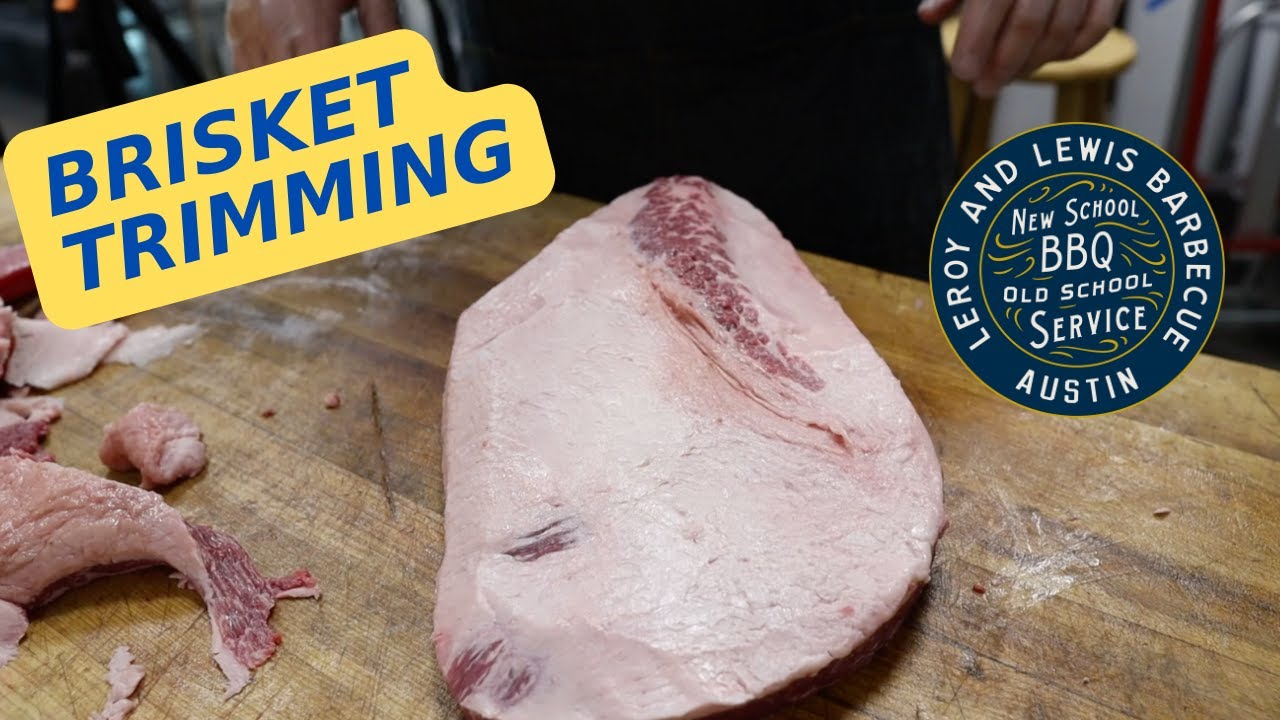
A Technical Guide

Texas-Style
Brisket

when you only have an electric smoker on hand (eek)

Compiled from five pitmaster sources and cross-referenced for consensus.
With some thermodynamics thrown in for good measure.

01 — Preparation
Meat Prep
Start with the best whole packer you can get. Prime grade has the most intramuscular fat, which renders into richness during the cook and gives you more room for mistakes.

Trimming

All sources agree: you want an "aerodynamic" shape (Franklin's word) with even thickness so it cooks evenly. The smoker uses convective heat, so air and smoke need to roll smoothly over the surface. Anything protruding catches too much heat; anything too thin curls up, pools juices, and ruins the crust. Expect to lose 15–20% of starting weight in trim.

LeRoy and Lewis break trimming into five cuts. This order works on any brisket.

  • 1. Deckle fat Flip to the meat side. Find the big fat chunk where the point meets the flat — dig your finger in, find the natural seam, peel it away, then knife it out. Cut the piece in half to confirm you lost zero meat. This is the most important cut: without it, your best slices have a slab of unrendered fat on the bottom.
  • 2. Underside cleanupRemove silver skin from the back of the flat. Trick: slice with the grain, not against it. Going against the grain makes silver skin fight you. Remove any remaining fat globs from the meat side.
  • 3. Mohawk Flip to fat side. Remove the raised hump of fat on the point (the "Mohawk"). Round off where the point meets the flat in one smooth motion.
  • 4. Fat cap Trim to ~1/4 inch uniform thickness. Use the thinnest spot as your guide and match the rest to it. Remove any hard, waxy fat that won't render. Scrape the surface with the blade to smooth out knife marks — helps airflow.
  • 5. Shape the sides Make the two long sides roughly parallel. Round off thin corners on the flat, which dry out and turn to jerky. Remove any oxidized (brown) meat to expose fresh surface. The goal is a smooth oval that won't catch or deflect airflow.
  • Trimmings Sort into two piles as you go. Fat goes into tallow. Meat scraps go into burgers — they're more valuable ground than overcooked on the brisket.

If you accidentally scalp the fat cap down to bare meat, don't panic. It happens to everyone, including the crew at LeRoy and Lewis, on camera, multiple times.

How to Trim a Brisket — Joe Yim

Joe Yim (LeRoy and Lewis, Austin)

Tallow Rendering

Put all fat trimmings in a slow cooker on low for the day. Stir occasionally. Strain the liquid fat into a jar and save it for the wrap phase. Much better than store-bought tallow because it's from the same animal.

Grain Direction

Before seasoning, score a small mark on the flat against the grain. After 12+ hours of cooking, the grain is hard to read. Slicing with the grain instead of against it ruins the texture of every slice.

The Dalmatian Rub
Four of five sources use exactly the same rub, because it is the Texas standard.
50% / 50%

Coarse kosher salt & coarse black pepper

The coarse grind attracts smoke and provides surface texture that builds into bark. Equal parts by volume.

Optional additions: Equal part paprika makes a three-way split. Garlic powder is the most common extra beyond that. No sugar on beef.

Application

  • Dissolve 1/4 teaspoon Prague powder #1 (curing salt) in 2–3 tablespoons of water. Spray or brush evenly over the entire surface. This guarantees a deep smoke ring — the nitrite converts to nitric oxide and reacts with myoglobin, the same chemistry that happens naturally from smoke but more reliably, especially in an electric smoker where smoke exposure is limited.
  • Optional: thin layer of yellow mustard as a binder. It burns off completely during cooking, leaving no mustard flavor.
  • Pat the rub on from 8–10 inches above the surface for even distribution. Don't work it in; just let it stick on contact.
  • Coat all sides generously: back, top, sides, edges.
  • Let it sit at least 30 minutes. The night before (wrapped in plastic, refrigerated) gives salt time to penetrate and season the meat deeply.
BBQ Science
If you know what's actually happening inside the meat, the cook stops feeling like guesswork. Most decisions trace back to a handful of physical processes.

Collagen → Gelatin

Why Brisket Gets Tender

Brisket is tough because it's loaded with collagen. Heat converts collagen into gelatin, which is what makes the finished meat soft, rich, and able to hold moisture.

The conversion follows the Arrhenius equation and is exponential with temperature. Below 195°F, every 20°F increase makes it ~1.8× faster. Above 195°F, that jumps to ~2.8× faster.

$$k = A \cdot e^{-E_a / RT}$$ The Arrhenius Equation — reaction rate as a function of temperature
$k$Rate constant (collagen → gelatin conversion rate) $A$Pre-exponential factor (frequency of molecular collisions) $E_a$Activation energy (energy barrier for collagen breakdown) $R$Universal gas constant (8.314 J/mol·K) $T$Absolute temperature in Kelvin

Because the relationship is exponential, small temperature increases at the top end have a disproportionate effect. Less than 20% of collagen breakdown occurs during the long middle climb. More than half occurs after wrapping, during the final push above 195°F. The last phase of the cook does more for tenderness than all the hours before it combined.

Relative collagen conversion rate vs. internal temperature (Arrhenius model)

The Stall

Evaporative Cooling Plateau

Idealized internal temperature curve during a 14-hour brisket cook at 250°F pit temp

Around 140–160°F internal, the brisket's temperature stops rising for hours. Muscle fibers contract and squeeze moisture to the surface, where it evaporates, cooling the meat the same way sweat cools skin. The heat going in and the cooling from evaporation reach equilibrium, and the temperature flatlines.

Before the stall resolves around 170–180°F, roughly 20% of the brisket's weight evaporates as water. That's about two pounds on a full packer. At 250°F pit temperature, pushing through unwrapped takes around 4 hours. Wrapping in butcher paper reduces evaporation while still allowing some airflow, which breaks the equilibrium and gets the temperature climbing again.

$$Q_{\text{in}} = Q_{\text{evap}} + Q_{\text{heat}}$$ Energy balance during the stall
$Q_{\text{in}}$Heat input from smoker (convection + radiation) $Q_{\text{evap}}$Heat lost to evaporation ($\dot{m} \cdot L_v$) $Q_{\text{heat}}$Heat raising internal temperature ($m c_p \Delta T$)

At the stall, $Q_{\text{evap}} \approx Q_{\text{in}}$, so $Q_{\text{heat}} \approx 0$ and the temperature stops moving. The latent heat of vaporization of water ($L_v = 2{,}260$ kJ/kg) is enormous: evaporating 1 kg of water absorbs the same energy as heating 5 kg of meat by 100°F.

Smoke Chemistry

How Smoke Actually Works

Smoke flavor isn't about coating the surface with layer after layer of smoke. When wood burns, it releases molecules that react chemically with proteins, fats, and sugars on the meat's surface. Once there's enough smoke to get the reaction going, additional smoke doesn't improve flavor. It makes things bitter.

140–150°F Smoke absorption drops significantly after this internal temp. Load chips early.
VENT OPEN Good airflow = cleaner burn = desirable compounds. Dirty smoke makes bitter bark.
> 200°F surface Maillard browning (bark formation) accelerates once the meat surface dries out and crosses 200°F. Evaporative cooling keeps the surface below that for most of the cook, which is why bark takes hours to form.
Smoke absorption effectiveness vs. internal meat temperature
$$J = -D \frac{\partial C}{\partial x}$$ Fick's First Law — smoke compound diffusion into meat
$J$Diffusion flux (mass of smoke compounds per area per time) $D$Diffusion coefficient (depends on meat temperature and porosity) $\partial C / \partial x$Concentration gradient (smoke compounds at surface vs. interior)

Cold meat has a steep concentration gradient (dense smoke outside, none inside), so $J$ is high. As the surface heats and proteins denature, $D$ drops and the surface becomes less permeable. Most of the useful smoke absorption happens in the first few hours.

The Smoke Ring

The pink ring beneath the bark is caused by nitric oxide (from smoke) reacting with myoglobin in the meat. The reaction can only happen while the myoglobin is still in its native state; once the surface heats past denaturation, it stops. Low-and-slow at 225–250°F with smoke in the first hours creates the right conditions. A piece of lump charcoal in the wood box provides extra nitric oxide. The smoke ring has zero effect on flavor or tenderness, but it looks great on the cutting board.

Surface Chemistry

Bark Formation

Bark forms when smoke, rendered fat, and seasonings combine through the Maillard reaction on the meat's surface. Coarse pepper physically attracts smoke and provides texture. Bark needs time and a dry surface to develop, so anything that keeps the surface wet slows it down.

The stall actually helps bark formation because it dries the surface out. Even after cooking, bark keeps developing during the rest as pigments polymerize into darker molecules and harsh smoke volatiles mellow.

The bark set test: Scrape a finger across the surface. If the rub comes off, it's not set. When it holds firm, you're ready to wrap.

Rendering

Fat: Two Types

Hard fat (thick, white, waxy) does not render well. It stays chewy and inedible no matter how long you cook it, so trim it off.

Intramuscular fat (marbling) renders during the cook and bastes the meat from inside. Prime grade has the most marbling, which is why it's the preferred grade for brisket.

Fat starts rendering at 140–160°F. You can check by pressing the fat cap with a fingertip. Early in the cook it feels rubbery and bounces back. When it has rendered, it gives under pressure and the color shifts from white to a caramelly yellow. Wait for the fat to give before wrapping.

Franklin's Experiment

The Wrap: Foil vs. Paper vs. Naked

Aaron Franklin ran a controlled experiment with three identical prime briskets on the same cooker with the same fire, varying only the wrap method.

Aluminum Foil

The Texas Crutch
  • Moistest of the three
  • "Pot roasty" quality
  • Bark held up better than expected
  • Traps all moisture with zero evaporation
Moisture
Bark
Beef flavor

Unwrapped

Naked
  • Crunchiest bark, heaviest pepper flavor
  • "Super Texasy, simple flavors"
  • A hair smokier than the others
  • Least beefy flavor; drier, with less fat reabsorption
Moisture
Bark
Beef flavor

Spreading beef tallow on the butcher paper before wrapping adds moisture protection and richness while creating a sealed fat layer that won't dissolve the bark the way trapped steam in foil does.

Post-Cook

The Rest

Cut too soon and the juices run out onto the cutting board instead of staying in the meat. Resting lets the muscle fibers relax and reabsorb moisture. It also gives bark pigments time to polymerize into their final dark color, lets collagen keep converting above 170°F, and allows the internal temperature to equalize so the whole brisket reaches a consistent texture.

A lot of backyard briskets that come out "just okay" were cooked well and rested too briefly.

$$T(t) = T_{\text{env}} + (T_0 - T_{\text{env}}) \cdot e^{-kt}$$ Newton's Law of Cooling — temperature decay during rest
$T(t)$Brisket temperature at time $t$ $T_{\text{env}}$Ambient temperature (room, cooler, or holding oven) $T_0$Initial temperature when pulled from oven (~203°F) $k$Cooling constant (insulation, mass, and wrapping reduce $k$)

A wrapped 14 lb brisket in a towel-lined cooler cools slowly because $k$ is small. At room temperature it drops faster. A holding oven at 160–170°F sets $T_{\text{env}}$ high enough that the brisket never reaches the 140°F danger zone regardless of hold time.

2 hr

Minimum rest

4–12 hr

Restaurant standard

140°F

Food safety floor

04 — The Equipment
The Electric Smoker
A heating element at the bottom, wood chips in a small box, an insulated steel body. Closer to a very slow oven that smokes than a traditional pit. Models like the Smokin' Tex, Masterbuilt, and Bradley all follow this basic design.

Strength

Temperature Stability

Set it and it holds. No fire management, no charcoal, no vent adjustments every hour. Temperature consistency is the single biggest variable in brisket cooking, and electric smokers take it off the table.

Strength

Low Wood Consumption

1/4 to 1/2 cup of chips total for an entire cook. The sealed, insulated environment makes a small amount go a long way.

Strength

Doubles as Holding Oven

After the cook, set it to 140°F with no wood. The insulated box holds the wrapped brisket at ideal serving temperature for up to 12 hours. Same technique BBQ restaurants use with commercial holding cabinets.

Limitations & Workarounds

STEAM The tight seal traps moisture. Too much steam softens bark and delays bark formation. Fix: Open the door every 2–3 hours, let the steam cloud escape (~5–10 seconds), close it.
HEAT LOSS Each door opening drops temp 50°F+ with slow recovery. Fix: Use a remote probe thermometer. Never open to check temp.
SIZE Most electric smokers handle briskets up to ~12 lbs comfortably. Larger trimmed packers will be tight. Fix: Check fit first. The meat shrinks during the cook. An oven finish means it only needs to fit for the smoke phase.
MAX TEMP Most top out around 250–275°F. Fine for smoking, but the kitchen oven at 275–300°F is better for the wrapped finish phase.

Wood Selection

Chips + Chunks

Electric smoker wood boxes are small, but you can mix chips with a few small chunks. Chips ignite faster and give immediate smoke; chunks smolder longer and extend the smoke window. Using chips alone can underperform on smoke ring — the mix covers both bases. Load before the cook starts. No need to reload after 150°F internal since the meat won't absorb much more smoke by then. Err on the side of less wood. Over-smoking is a more common mistake than under-smoking.

Oak

The Texas Classic

Clean, medium smoke flavor. The default choice for central Texas brisket and a safe starting point if you haven't used your smoker before.

Hickory

Bold & Traditional

Stronger, more assertive. Traditional BBQ flavor. A common recommendation for electric smokers.

Pecan

The Mild Alternative

Milder and slightly sweet. Lets the beef flavor stay in front while adding just enough smoke to know it's there.

Electric Smoker + Oven Finish
Smoke in the electric smoker, then wrap and finish in the kitchen oven. Once it's wrapped, the brisket isn't absorbing smoke anymore, so the oven gives you better temperature control and avoids the steam accumulation problem that plagues electric smokers in the second half. Total time: 10–14 hours.

Equipment note: The specific walkthrough below uses a Smokin' Tex with an 18 lb prime packer. The method works with any electric smoker; adjust times based on your model and your brisket's size.

Phase 1 — Hours 0–8

Smoke

  1. Line smoker with foil. Fill the water pan if your model has one; the humidity helps smoke absorption and buffers heat from the element.
  2. Load wood: mix chips and small chunks (oak, hickory, or pecan). Chips ignite fast for immediate smoke; chunks smolder longer. This is for flavor, not smoke ring — the curing salt applied during seasoning handles that.
  3. Place brisket fat side down (the heating element is below, so the fat cap shields the meat from direct heat). Point the thicker point end toward the element.
  4. Then set smoker to 250°F. Loading the meat cold before turning on maximizes early smoke absorption — the meat picks up the most smoke while its surface is still cold and wet. The curing salt is also doing its work during these early hours: as the meat heats, the nitrite converts to nitric oxide and reacts with myoglobin while it's still below ~140°F. By the time the surface hits 140°F, the smoke ring is locked in.
  5. Vent steam every 2–3 hours: open the door, let the visible steam cloud escape (~5–10 seconds), close it. This helps the surface dry out for bark formation.
  6. Spritz edges (not the fat cap) with 50/50 water and apple cider vinegar starting around hour 4–5.
Phase 2 — ~165–175°F Internal

The Wrap

Don't wrap by temperature alone. All four criteria must be met:

  1. Internal temp has reached 165–175°F
  2. Surface moisture has dried and there's no more pooling liquid on top
  3. Bark is dark and well-formed
  4. Bark is "set," meaning scraping a finger across it doesn't easily remove it

Wrapping technique: Lay out food-grade unwaxed butcher paper. Spread rendered beef tallow where the meat will sit. Place the brisket down, pour more tallow over the top, and wrap as tightly as you can. Place the wrapped brisket in an aluminum pan to catch drippings.

Phase 3 — 2–4 Hours in the Oven

Oven Finish

Transfer wrapped brisket in its pan to the kitchen oven at 275–300°F. Start checking after 1.5–2 hours.

Phase 4 — 2–12 Hours

Rest

Short rest: 2 hours on the counter, still wrapped, on a wire rack. Wait until internal temp drops to around 150°F before slicing.

Long rest (recommended): Set your electric smoker to 140°F with no wood — it doubles as a holding oven. Place the wrapped brisket back in and hold for up to 12 hours. This is what BBQ restaurants do: the brisket stays at ideal serving temperature (140–145°F) indefinitely and stays food-safe. Some pitmasters say the extended hold makes the brisket even more tender.

Doneness — Three Tests

The brisket is done when it passes all three. If it hits 203°F but the probe still meets resistance, keep cooking. Some briskets need 207°F+ for the collagen to fully convert.

Test 1

Temperature

203°F

Minimum internal temperature, measured in the flat. The flat is leaner and less forgiving than the point, so it's the part to watch.

Test 2

Probe Test

An instant-read thermometer slides into the thickest part of the flat like a knife through room-temperature butter, with no resistance or dragging.

Test 3

Feel Test

Pick it up with gloved hands. It should bend and feel floppy, not rigid. If it holds its shape like a board, it needs more time.

When in doubt, cook longer. An overcooked brisket (within reason) is more enjoyable than an undercooked one. The collagen hasn't fully converted until the probe slides in like butter.

06 — Serving
Slicing

The flat and point grains run in different directions. Separate them at the fat seam, then slice each against its own grain.

Slices should be about pencil-thickness: thick enough to hold together, thin enough to be tender.

Only slice what you plan to serve immediately and keep the rest whole, because sliced brisket dries out fast.

FLAT POINT FAT SEAM SLICE ↔ SLICE ↕ Arrows show grain direction. Always slice perpendicular to the grain.
Smokin' Tex — First-Time Setup
New unit burn-in procedure and prep for your first cook. Do this once before cooking any food.

Burn-In (One Time)

  1. Remove all racks, drip trays, and accessories from the cabinet.
  2. Open the firebox lid and load 8 oz of wood chips (the unit ships with a sample bag of hickory).
  3. Close the firebox, close the door, and set the dial to 215°F.
  4. Let it run for 4 hours. Smoke will start in about 15–20 minutes once the element heats the chips. This seasons the interior.
  5. Turn off and let cool completely. Dump the ash from the firebox.

Prep for First Cook

  1. Line the firebox lid with aluminum foil for easy cleanup.
  2. Line the base plate with foil, leaving the grease drain hole open so drippings flow into the pan below.
  3. Line the grease drip tray with foil.
  4. Reinstall racks. The unit has 4 adjustable stainless steel racks — position them for your brisket size.
  5. Place your meat in the smoker, load wood into the firebox, then turn it on.

The 100°F trick: The Smokin' Tex goes as low as 100°F, which most smokers can't do. Use this for cold smoking cheese, jerky (at 130°F with the optional jerky dryer attachment), or as a holding oven at 140°F after a cook.

Resources
The videos this guide was compiled from, listed roughly in order of how much they influenced the final method.